Short videos move fast now. People decide within a few seconds whether they want to continue watching or scroll away. This is why creators, students, influencers, and even small business owners continue to seek advice on How to Use CapCut to enhance the quality of their content without resorting to complex editing programs. The app is simple initially, but actually, when you start testing its features, it has surprisingly powerful capabilities when it comes to mobile editing.
Simple transitions and basic trimming are used by many users. After making more videos, they then start incorporating captions, beat syncing, cinematic effects, and templates to make videos appear to have been professionally edited. I spent the time making travel videos on CapCut with the ability to edit travel clips, talking-head videos, and Instagram Reels, and truthfully, the experience was much smoother in comparison with many free editing applications in existence currently.
The biggest reason behind the app’s popularity is convenience. You can record a clip, edit it, add captions, sync music, and export everything directly from your phone within minutes. That speed matters a lot when you post content regularly.
What is CapCut and Why Creators Use It Daily?
CapCut is a video editing application created by ByteDance, the same company behind TikTok. The app works on Android phones, iPhones, Windows, Mac, and even browsers, so creators can edit content almost anywhere. The app has gained popularity primarily due to the fact that it takes ease-of-use controls and complex editing features. Users are not forced to learn hard software with complicated schedules in order to produce high-quality short videos; rather, they can do this using easy drag-and-drop editing.
The reason why many individuals who are hunting for how to use capcut for beginners in order to learn the basics of the software prefer using the software is that the learning curve is manageable even for first-time editors. Within the CapCut, templates, transitions, effects, text animations, AI features, and music controls are also available in a single platform. That is time-saving since creators do not require different apps to achieve each editing operation.
Main Features That Make CapCut Popular
| Feature | Benefit |
| Templates | Faster editing |
| Mobile editing | Easy workflow |
| AI tools | Quick adjustments |
| Auto captions | Better accessibility |
| Effects library | Creative freedom |
| Cloud sync | Project backup |
After testing the app on both Android and desktop, one thing became clear. The mobile version feels more optimized for fast social media editing, especially for Reels and TikTok content.
How to Use CapCut for Better Social Media Videos
Learning How to Use CapCut becomes easier once you understand the home screen and timeline. Most beginners think editing will feel technical, but the app organizes tools clearly. You can start editing within minutes even if you have never edited a video before. The home page includes options for new projects, templates, saved drafts, and cloud storage. Once you tap “New Project,” CapCut asks permission to access your gallery. After selecting clips or photos, the timeline opens automatically.
Creators often make the mistake of adding too many effects immediately. Instead, focus on smooth cuts, readable captions, and proper pacing first. That approach improves videos much faster.
Basic Steps to Start Editing
- Open CapCut
- Tap “New Project”
- Select clips or photos
- Add media to timeline
- Start trimming and editing
Best Content Types for CapCut
| Content Style | Why CapCut Works Well |
| Instagram Reels | Fast editing |
| TikTok videos | Trend-friendly templates |
| Travel edits | Cinematic filters |
| Tutorials | Caption tools |
| Product videos | Smooth transitions |
A creator from Delhi recently mentioned that she edits café videos directly on her phone during metro rides because the app loads quickly and exports fast. That convenience explains why so many creators rely on it daily.
How to Edit in CapCut Without Making Videos Look Messy
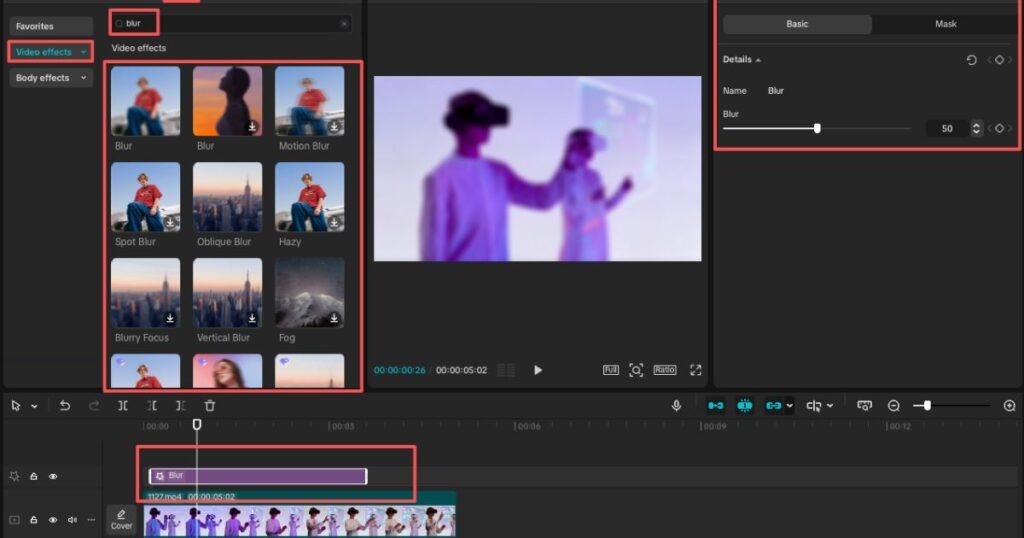
Editing quality depends more on timing and pacing than expensive effects. The timeline inside CapCut acts as the main workspace where you trim clips, arrange footage, insert captions, and control transitions. People searching for how to edit videos in capcut usually want practical editing steps rather than technical explanations. The best way to learn is by editing smaller projects first instead of trying cinematic edits immediately.
Good short-form editing keeps viewers engaged constantly. Long pauses, slow intros, and random transitions usually reduce retention quickly.
Getting Started With Your First CapCut Project
The first project should stay simple. Import two or three short clips and focus on learning trimming and text tools first. Once you understand the timeline, advanced features become easier naturally. The app opens directly into the editing timeline after adding clips. You can swipe across the toolbar to access speed controls, audio tools, captions, effects, and filters.
Helpful Beginner Editing Habits
| Habit | Why It Helps |
| Use short clips | Keeps pacing fast |
| Add captions | Improves watch time |
| Cut pauses | Makes videos smoother |
| Use clean transitions | Looks more professional |
Many creators overload their first edits with effects. Cleaner editing almost always performs better.
Creating a New Project and Adding Content
Starting a project takes only a few taps. Open the app, select “New Project,” and choose your videos or photos. Once imported, the clips appear directly on the timeline in sequence. CapCut also includes a built-in library with stock videos, stickers, transitions, overlays, and sound effects. Some resources remain free, while premium assets require the Pro version.
Types of Media Supported
| Media Type | Supported |
| Videos | Yes |
| Photos | Yes |
| Audio files | Yes |
| Voice recordings | Yes |
| GIFs | Yes |
Short clips usually work better for Instagram Reels and TikTok because viewers prefer faster pacing.
Navigating the CapCut Editing Timeline Properly
The editing toolbar appears at the bottom of the screen. Each section opens another set of editing options like text, effects, transitions, audio, or filters. Understanding the timeline is the most important part of learning How to Use CapCut effectively. Once you feel comfortable moving clips and trimming footage, the editing process starts feeling natural.
Most Useful Editing Tools
| Tool | Main Purpose |
| Split | Cut clips |
| Speed | Slow or speed footage |
| Audio | Add music |
| Text | Add captions |
| Effects | Add visual effects |
| Filters | Improve colors |
While editing product videos recently, I noticed that smoother cuts improved the final result more than heavy transitions did. Clean pacing matters more than flashy editing.
How to Add Text in CapCut for Better Engagement
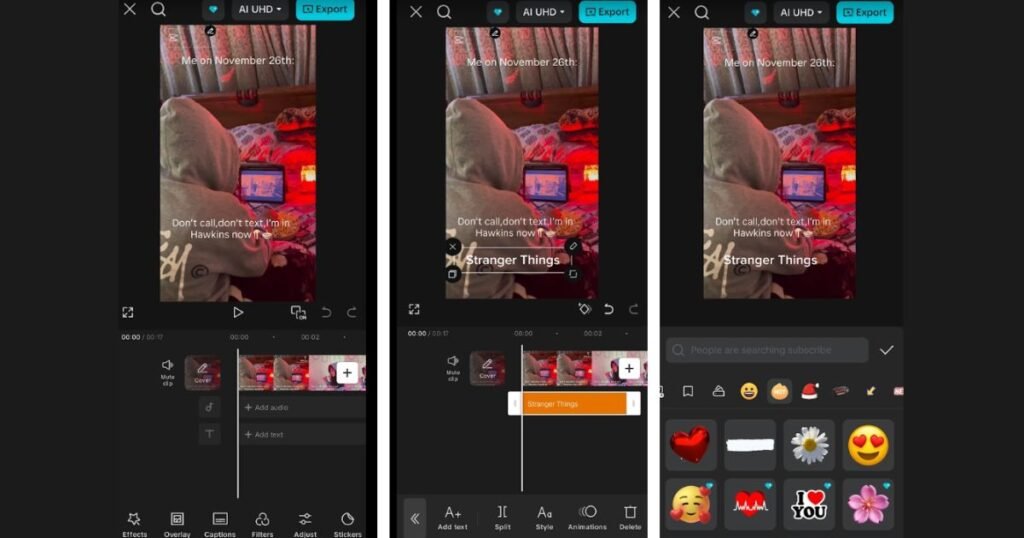
Captions improve engagement because many users watch videos silently while scrolling social media feeds. Good text placement helps viewers understand the message instantly. A proper capcut video editing tutorial always focuses on captions because unreadable text hurts retention badly.
1. Tap the Add Text Button
Open the toolbar and select “Text.” Then tap “Add Text.” A text layer appears directly on your preview screen. Try placing captions slightly above the bottom edge because Instagram and TikTok interface buttons may cover lower text sections.
2. Type in Your Text
Keep captions short and easy to read. Long paragraphs usually distract viewers during short-form content.
Caption Styles That Work Well
| Caption Style | Best Use |
| Bold text | Tutorials |
| Minimal subtitles | Cinematic edits |
| Animated captions | Comedy videos |
| White text with shadow | General content |
Simple text often performs better than flashy animated fonts.
3. Customize Your Text
CapCut allows users to adjust fonts, colors, shadows, outlines, and animations. Most creators prefer clean fonts because readability matters more than decoration. One of the easiest capcut editing tips and tricks involves adding a soft shadow behind captions. That small change improves readability instantly across bright backgrounds.
4. Finalize Your Text and Adjust the Duration
After customizing the text, confirm the changes using the check mark button. A text layer then appears on the timeline. Adjust the text duration by dragging the edges of the caption layer. Keep captions synced with spoken words whenever possible.
How to Add Music in CapCut Without Overpowering Dialogue
Music changes the emotional feel of a video immediately. A simple walking clip can suddenly feel cinematic with the right soundtrack. CapCut includes trending sounds, imported audio support, voice tools, and built-in music libraries. While testing edits for Instagram Reels, I noticed the audio syncing system felt responsive and smooth.
1. Tap the Audio Button
Select the “Audio” section from the toolbar. Then choose “Sounds” to browse music categories. The app organizes tracks into trending audio, moods, genres, and creator recommendations.
2. Browse and Add Music
Preview multiple tracks before selecting one. Some sounds work better for travel edits while others fit tutorials or comedy clips.
Popular Music Styles
| Audio Type | Best For |
| Cinematic music | Travel videos |
| Lo-fi beats | Study content |
| Fast-paced tracks | Fitness videos |
| Soft piano | Emotional edits |
Music should support the visuals instead of dominating them.
3. Finalize Your Audio
After adding audio, adjust the volume carefully. Loud background music often ruins voice clarity.
Useful Audio Adjustments
- Fade in
- Fade out
- Lower background volume
- Sync cuts with beats
Balanced audio usually improves video quality faster than extra effects.
How to Zoom In for More Dynamic Video Edits
Zoom effects help creators highlight reactions, products, and dramatic moments. Still, overusing zoom transitions can make videos feel distracting. The best creators use zoom effects carefully because subtle movement looks cleaner and more professional.
1. Navigate to Effects > Video Effects
Open the “Effects” section and select “Video Effects.” Trending effects appear automatically.
2. Search for Zoom
Use the search bar to explore zoom effects like cinematic zoom, punch zoom, and smooth zoom.
Common Zoom Effects
| Zoom Style | Best Use |
| Smooth zoom | Storytelling |
| Punch zoom | Reactions |
| Cinematic zoom | Emotional scenes |
Fast zoom effects suit energetic videos better than calm cinematic edits.
3. Add Your Effect to Your Video
Apply the zoom effect and adjust its duration on the timeline. Shorter zoom effects usually feel cleaner and more natural.
How to Blur Backgrounds and Objects in CapCut?
Blur effects help creators hide distractions, protect sensitive details, or create cinematic depth inside videos. CapCut includes several blur styles that work well for social media content.
1. Navigate to Effects > Video Effects
Open the Effects section again and tap “Video Effects.”
2. Search for Blur
Type “Blur” inside the search bar. Multiple blur styles appear, including motion blur and soft focus blur.
3. Add Your Effect to Your Video
Apply the blur effect carefully instead of increasing intensity too much. Mild blur usually looks more professional.
How to Reverse a Video for Creative Effects
Reverse effects work well for sports edits, transition videos, and cinematic clips. The process stays simple inside CapCut. Many creators combine reverse footage with slow motion for dramatic edits.
1. Tap on Your Video on Your Timeline
Select the clip you want to reverse. Then scroll through the toolbar until you locate the “Reverse” option.
2. Add Reverse to Your Video
Tap the reverse button and wait for processing to finish. Short clips reverse quickly, while longer footage takes more time.
How to Use CapCut Templates for Faster Editing
Templates remain one of the biggest reasons behind the app’s popularity. Instead of manually creating transitions and beat syncing, templates automate most of the editing process. People searching for how to use capcut templates usually want quick results without spending hours editing.
1. Navigate to Templates
Open the Templates section from the home screen instead of starting inside an existing project.
2. Search or Browse Templates
CapCut organizes templates into categories like cinematic edits, fashion content, memes, travel videos, and trending social styles.
Popular Template Categories
| Template Type | Best Use |
| Travel edits | Vacation reels |
| Beat-sync templates | Music videos |
| Fashion transitions | Outfit edits |
| Slow-motion templates | Cinematic content |
Trending templates often perform better because viewers already recognize the editing style.
3. Add Your Photos or Videos
Choose the clips or photos requested by the template. Some templates work better with photos, while others require short video clips.
4. Preview Your Template and Make Any Edits
Preview the complete edit before exporting. Replace weak clips if pacing feels awkward. A proper capcut mobile video editing guide always emphasizes previewing because timing affects retention heavily.
5. Export Your Video
Tap the export button and select suitable quality settings.
Recommended Export Settings
| Setting | Recommended Option |
| Resolution | 1080p |
| Frame Rate | 30fps |
| Aspect Ratio | 9:16 |
Higher export quality helps videos look sharper on social platforms.
How to Remove the CapCut Watermark Properly
Some template exports add a CapCut watermark clip at the end of the video. You can usually remove it manually before exporting. Open the timeline and delete the ending watermark section if it appears. Several creators forget this step and upload videos with unnecessary branding attached.
Conclusion
Learning How to Use CapCut becomes much easier once you focus on pacing, storytelling, and clean editing instead of overusing effects. Beginners can use the app particularly well as it does not have technical barriers, but it provides high-level creative tools. Balanced audio, short captions, smooth cuts and contemplative transitions tend to make a more impactful video than complex edits.
Having spent some time editing travel videos, tutorials and short-form content within the app, something became clear. CapCut is most effective with an intentional and simple workflow maintained by creators. Begin with smaller edits, study the timeline, and get better at it through practice. That process develops editing confidence (far more quickly) compared to experimenting with using all features simultaneously.