
A great video does more than show good footage. It creates a smooth viewing experience from beginning to end. When clips start and end naturally in-between scenes, the viewers’ interest is kept and they are drawn to the content for a longer duration. This is where transitions are useful. As a new creator, much of your time will be spent going through various CapCut video editing tutorials, applying music, and colour tuning. However, they tend to miss out on transitions. Because of that their videos seem disjointed, even if the shots are well taken. When you learn How to Add Transitions in CapCut, the flow of your content will suddenly be more raised and it will look much fancier.
Whether you’re making Instagram reels, YouTube Shorts, travel videos, tutorial videos, or videos for your business, the right transition makes for a slick selection of scenes. The transition stays in focus of the viewers as it does not make its way to the viewers themselves but keeps the viewer in the story. Once you understand how transitions work, your videos start looking cleaner, smoother, and more professional.
What Is a Video Transition?
Video transitions act as bridges between scenes. They lead the way for the viewer’s gaze and serve to carry the story without interruption. Transitions tie in different moments in a vlog, travel video, tutorial or promotional reel in a natural way, whether you’re editing one or any other type of video. You can use a transition between different images; such as switching from a beach scene to a mountainscape to create a more subtle, yet noticeable, change between shots. Based on this, the viewers remain engrossed in content.
Why Do Video Transitions Matter?
Transitions do more than make videos look attractive. They also improve storytelling and viewer retention.
| Benefit | How It Helps |
| Better Flow | Connects scenes naturally |
| Improved Engagement | Keeps viewers watching longer |
| Professional Appearance | Makes videos look polished |
| Stronger Storytelling | Helps scenes feel connected |
| Better Viewing Experience | Reduces awkward scene changes |
Let’s take an example of a lifestyle creator shooting a morning routine, he/she may apply soft fades to achieve a relaxed atmosphere. In the meantime, quick zoom cuts are frequently selected by a fitness creator as a way to provide power and drive.
How to Add Transitions in CapCut Step by Step for Beginners?
When you are aware of what transitions are, the next step is learning How to Add Transitions in CapCut in the most appropriate way. Good when it comes to working with CapCut; the simplest users can easily understand how to do it. You should have at least two clips on the same track in the timeline to add any transition. The only transitions that can be used are those between one clip and another hence one cannot use a transition on a single clip in CapCut.
Step 1: Import Your Clips
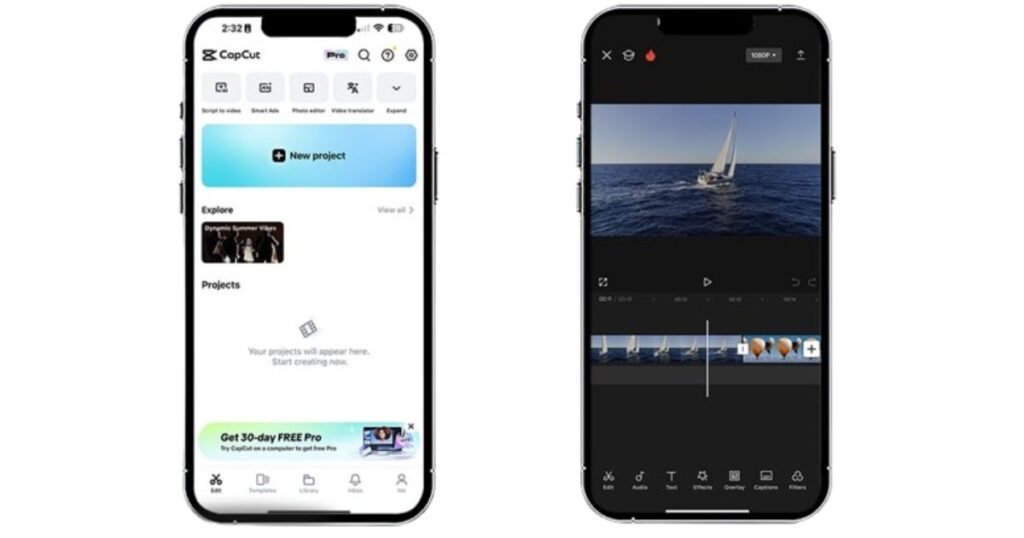
Open CapCut and create a new project. Import the videos or images you want to edit and drag them onto the timeline. Arrange the clips in the order you want viewers to see them. Spending a few extra minutes organizing your timeline now will save editing time later.
Step 2: Open the Transition Library
Look at the editing panel and click the Transitions tab. CapCut will display multiple categories filled with different effects.
Some popular categories include:
- Basic
- Blur
- Camera
- Zoom
- Distortion
- Glitch
- Light Effects
- Retro
Each category creates a different visual style. Therefore, choose transitions that match your video’s overall mood.
Step 3: Select and Download a Transition
If you are using the transition for the first time, it might be necessary to download it first to apply it with CapCut. Preview a few options before making your choice. While effects can offer a lot of flash, plain transitions may do the job.
Step 4: Apply the Transition
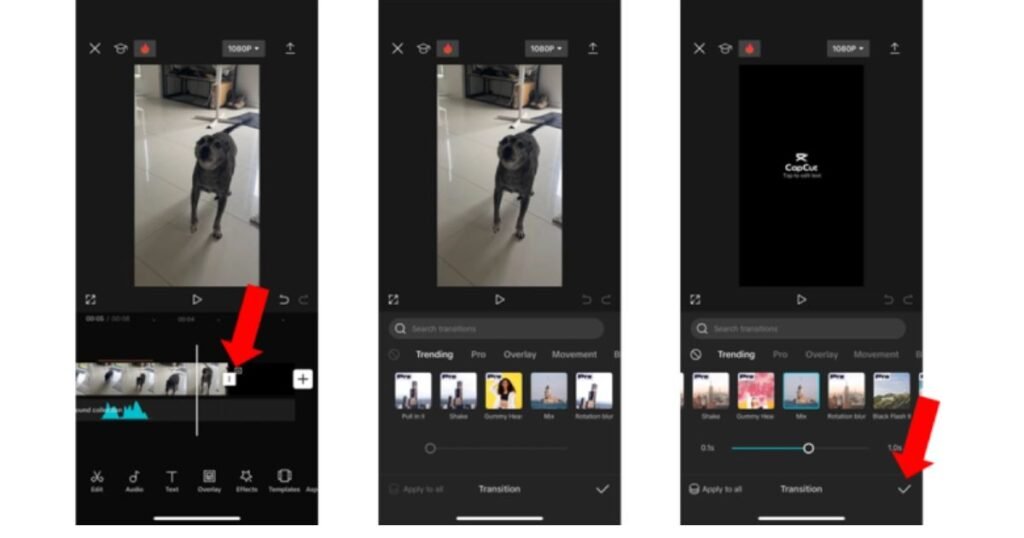
Place the selected transition between two clips on the timeline. After releasing the mouse button, CapCut will effortlessly insert the transition into the video. You can also simply hit the little add icon, and move the transition to its location without dragging.
You will find that the basic knowledge of How to Add Transitions in CapCut has been mastered after following the above steps, you will be able to play with different styles.
CapCut Transition Tutorial: Choosing the Right Transition for Every Video
A good capcut transition tutorial should not only explain where transitions are located. It should also give creators an idea of when and why some transitions are more effective than others. Employing a suitable editing style is essential for different video styles. A bumper video popular for a travel vlog can be completely inappropriate for a business presentation.
1. Best Transition Styles for Travel Videos
Travel videos benefit from movement. The camera-based transition effect and transition by zoom tend to be good options as they can help the subjects seem to be moving. Transitions create a visual representation of the movement between two destinations.
2. Recommended Effects for Reels and Shorts
Short-form videos require quick pacing. Many creators prefer blur, swipe, and zoom transitions because they maintain momentum without slowing down the content. The best capcut transitions for reels usually create movement while remaining subtle enough that viewers stay focused on the story.
3. Professional Transition Choices for Business Content
Business presentations require a cleaner approach. The simple dissolve and fade work better than flashy effects. Unlike home audiences, who much prefer drama, corporate crowds favor clarity and professionalism.
How to Use Transitions in CapCut Without Overediting
Many creators learn how to use transitions in capcut but then make a common mistake. They add a different transition between every clip. Although the effects may look impressive at first, excessive transitions quickly become distracting.
A good transition should support the story, not dominate it.
Imagine a travel vlog featuring ten different transition effects in one minute. Instead of enjoying the destinations, viewers focus on the editing tricks. As a result, the video feels chaotic.
Experienced editors often follow a simple rule:
“If viewers notice every transition, you are probably using too many.”
Instead, choose transitions that match the mood of your content and apply them consistently.
Signs You’re Overusing Transitions
- Every clip uses a different effect.
- Flash transitions appear repeatedly.
- Long transitions slow down the video.
- Effects distract viewers from the content.
- Scene changes feel forced rather than natural.
Keeping your transitions simple often creates stronger results.
How to Apply the Same Transition to Multiple Clips in CapCut?
In cases where a video constitutes a large number of clips, the single-clip transition might consume quite some time. CapCut offers a quick fix that enables you to add just one transition to the whole track. This aspect assists in continuousness of the video and makes viewing the video easier. It is particularly handy in travel videos, vlogs, guides, and social media contents where a consistent style of editing appears more professional.
The operation of this feature is to first make the transition you want between any two clips in the timeline. Then, open the settings panel of that transition by clicking on it which is shown on the right side of the screen. The transition settings will have an option of “Apply All”. When you choose this, CapCut automatically puts the same transition between all clips on that track. Consequently, this saves on time spent editing, ensures that there is visual consistency and great cleanliness at the end of the video without repeating the same action each time.
How to Adjust Transition Duration in CapCut for Better Video Flow?
The duration of transitions is a significant parameter that can be used to judge the smoothness and professionalism of a video. A brief transition would give a quick and vigorous effect whereas a longer transition would give a lighter and movie-like transition. Depending on the type of content that you are doing and the speed that you desire to stick with, the decision of selecting the appropriate length hinges on you. Very long transitions can make the video too slow and very short ones can be a shock to the viewers.
There are some few simple ways through which you can adjust transition duration using CapCut. Open the properties panel of the transition on the timeline, and first change the duration manually. The same can be done by dragging either of the edges of the transition onto the timeline to make it longer or shorter. Remember that the maximum length is based on the shorter clip adjacent to the transition. An example is that when one clip is four seconds long and the other three seconds long then the transition cannot be more than 1.5 seconds. The timing is also necessary to ensure there is a flow of things and enhances viewing experience.
Advanced Tips to Make CapCut Transitions Look More Natural
Even the appearance of many professional-like videos is based on sparse transitions and careful choices of the editing, instead of using fancy visual effect options.
1. Synchronizing Transitions With Music Beats
Music can significantly improve the effectiveness of a transition. When editors place transitions on strong beats or rhythm changes, the movement feels more intentional and satisfying to viewers.
2. Matching Camera Movement Across Clips
The movement in both clips should have a similar direction of movement so that a transition appears seamless. To illustrate, when the clip was running rightwards on the first side of the screen, a second clip having a similar motion produces a smooth movement on the screen.
3. Using Transition Timing to Control Video Pacing
The rapid changes provide momentum and action, and the slower ones allow more cinematic viewing experience. Modification of time based on content aids in having a steady pace of progress within the project.
4. Creating Visual Continuity Between Scenes
Editors frequently look for common visual elements between clips. Transitions can look more natural with similar colors, camera angles or patterns of movement without adding any effect to the image.
Best CapCut Transitions for Reels That Keep Viewers Watching
Short-form videos compete for attention every second, picking the most appropriate transition style can have a direct effect on how far your audience will scroll down the page and how engaged they are.
1. Motion Blur Effects for Smooth Lifestyle Content
Motion blur transitions are timeless because they offer a certain movement effect between clips so that people don’t get distracted from what’s going on. The aesthetic of minimalism and trust in the tools makes it ideal for content creators who make their lifestyle videos, vloggers or daily routines videos.
2. Zoom-Based Scene Changes for Travel and Adventure Videos
The zoom transition works well for travel videos where there are a lot of changes in location. These effects help to give the sense of movement and progression, making viewers feel like they are a part of the journey.
3. Swipe and Flash Effects for Fast-Paced Editing
Swipe transitions are great for creating app tutorials, product reveals, and any kind of tech reviews. Flash transitions, meanwhile, add energy and intensity, making them suitable for sports content, fitness videos, and action-focused reels.
4. Transition Selection Based on Audience Behavior
Editing styles will appeal to different audiences. Some viewers might appreciate more exciting cut in and out sequences but generally, professional audiences will appreciate clearer cut in and out sequences that go with the information rather than taking the center stage.
Common Problems While Adding Transitions in CapCut
Even experienced creators occasionally face issues while working with transitions. Understanding these common problems can save time and reduce frustration during editing.
1. Transition Effects Not Appearing on the Timeline
One of the most frequent issues occurs when editors attempt to apply a transition to a single clip. Since transitions connect two clips, CapCut requires at least two separate pieces of media before allowing an effect to be added.
2. Incorrect Transition Placement Between Clips
Sometimes a transition appears in an unexpected position. This is typically due to the fact that the position of the playhead or clip applied causes the location of the effect on the playhead.
3. Duration Restrictions Affecting Transition Length
The length of adjacent clips may also influence transition length. The aerial sounds work more or less in length depending on the short clips as well; there is not as much footage to support the effect and there are occasions when it isn’t working.
4. Preview Performance and Playback Delays
Projects with multiple effects can sometimes lag when previewed during projects playback. Sometimes changing the preview or letting the software preview portions of the timeline can boost performance.
Conclusion
Learning How to Add Transitions in CapCut can transform the way your videos feel. The right transition will create a better story, engage viewers and make your finished video more professional. CapCut has a ton of effects, but editors that do well just put their emphasis on balance. Practice simple transitions, try to find the right duration and consider which effects correspond to the content you are communicating. You’ll build a natural, smooth and ‘your’ style and become an editor over time.
FAQs
Q1. What is the easiest transition for beginners in CapCut?
Blur and fade transitions are usually the easiest because they work well in most situations.
Q2. Can I add transitions between photos in CapCut?
Yes, CapCut allows transitions between both images and videos.
Q3. Do transitions affect video quality?
No, transitions do not reduce video quality when exported correctly.
Q4. Which transition is best for travel reels?
Zoom and motion blur transitions usually work best for travel content.
Q5. Can I use different transitions in one video?
Yes, but keeping a consistent style often produces better results.
Q6. Why can’t I add a transition in CapCut?
You need at least two clips on the timeline before CapCut allows transitions.
Q7. Should every clip have a transition?
No. Sometimes a simple cut works better than a transition.
Related Article: How to Use CapCut for Smooth Video Editing in 2026